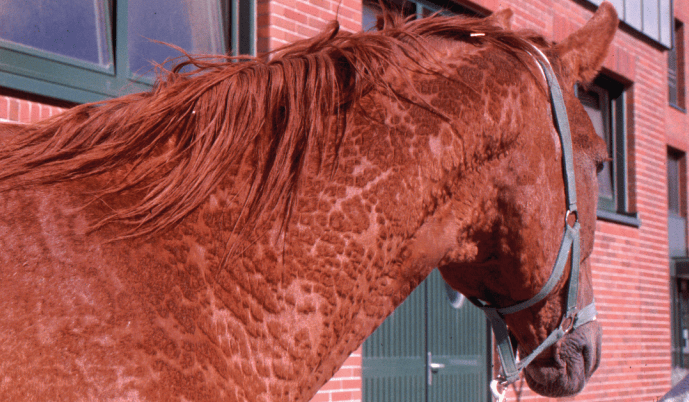
Fig. 1: Horse with pemphigus foliaceus
While horses are not large dogs, there are many procedures, such as dermatological examinations, that are very similar to those used in dogs.
The most important aspect is certainly the detailed patient history, as this often accounts for 70% of the diagnosis. This is often difficult, especially with horses, because who is the right person to contact – the owner, the rider, the trainer or the groom?
After a detailed history is obtained, a clinical examination should be performed. The horse should be examined from front to back, and from top to bottom. Mucous membranes and mucocutaneous junctions, hooves, chestnuts, ventral abdominal suture and ganaches, nothing should be forgotten.
A list of differential diagnoses is then drawn up, these are then ruled out or confirmed with the dermatological examination. Laboklin and BattLab offers a comprehensive brochure on the subject of dermatological examinations, in which all examinations are explained and illustrated in detail. Some of the examinations described here can be carried out in the practice, but all of them can of course be sent to the laboratory!
THE SUPERFICIAL SKIN SCRAPING
To perform a skin scraping, we need a sharp spoon or scalpel blade (used ones have proven to be effective as they minimise the risk of injury), paraffin oil, a microscope slide including cover slip, and a good quality microscope.
This superficial skin scraping is mainly used in horses to search for parasites such as Chorioptes bovis (formerly C equi), in rare cases also for Psoroptes, Sarcoptes or the red bird mite.
The scalpel blade and/or skin must be well moistened with paraffin oil. Then scrape very gently to obtain the largest possible amount of scales/material. The material adhering to the blade is carefully placed on a microscope slide with a drop of paraffin oil, mixed well and covered with a cover slip. The material adhering to the blade is carefully placed on a microscope slide with a drop of paraffin oil, mixed well and covered with a cover slip. The microscopic assessment is then carried out with the 4X magnification by systematically scanning the entire surface of the slide (in an orderly fashion (e.g., scan in a “down, across, then down, across” pattern).
Since a Chorioptes infestation usually causes itchy changes on the fetlocks, you can also hold a petri dish under the affected area and scrape material into it with a scalpel blade.
THE TRICHOGRAM
For trichoscopy, you need a mosquito clamp, a microscope slide, oil and a microscope. The hairs are pulled out in the direction of the hairline and placed on a microscope slide with a drop of paraffin oil. The samples are covered with a cover slip and analysed with the 4x and 10x magnification.
Trichoscopy can be used to diagnose dermatophytosis, however, this requires a certain amount of skill on the part of the examiner. The infected hair is often covered with spores and interspersed with hyphae. They therefore have an irregular (‘dirty’ looking) surface and are broken off at one end. However, a fungal culture or PCR is necessary in all cases to determine the type of dermatophyte.
Sometimes hair lice or their nits are also found on the hair.
The trichogram can also be useful in the diagnosis of non-inflammatory alopecia. Malformed roots can be found in follicular dystrophies/dysplasias and alopecia areata.
FUNGAL EXAMINATION
This requires a mosquito clamp, small paper bags for transporting the test material and Petri dishes with Sabouraud agar and DTM (Dermatophyte Test Medium) double culture medium.
FUNGAL CULTURE AND PCR
If dermatophytosis is suspected, hair samples should be sent to the laboratory. A fungal culture and/or PCR detection can be carried out in the laboratory. The hair is plucked from the edge of the suspected lesion.
CYTOLOGICAL EXAMINATION
The cytological examination is one of the most important and most frequently performed examinations in dermatology. It requires: microscope slides with a frosted edge for labelling, hypodermic needles, syringes, cotton swabs, scalpel blades, adhesive strips, staining solution, good quality microscope with 100X immersion magnification and immersion oil.
The cytological examination of samples is a useful, quick and inexpensive method for obtaining important information about an efflorescence within a few minutes. Depending on the skin change and localisation, there are various techniques for obtaining samples.
FINE-NEEDLE ASPIRATION
This technique can be used for all types of nodules. In principle, 20 – 25 G hyperdermic needles and 2 – 20 ml syringes can be used. As a general rule, the softer the tissue to be aspirated, the finer the needle should be.
The syringe is inserted into the tissue to be analysed and a vacuum is created. The needle is then retracted beneath the surface of the tissue and additionally reinserted at least twice in different directions in order to aspirate different areas of the lesion. To prevent the aspirated material from the needle from entering the syringe, the vacuum is released while the cannula is still in the tissue. The cannula is removed again, air is aspirated into the syringe, the needle is replaced and the contents of the needle are squeezed out onto the centre of one or more slides. Smearing should take place immediately after removal.
IMPRESSION CYTOLOGY
This technique is used for all exudative lesions, oily and scaly skin surfaces, pustules and crusts, cut surfaces of skin incisions or excision biopsies after the removed mass has been cut in half. In principle, a slide is ‘slapped’ onto the area from which the sample is to be taken. In the case of a crusty skin change, either the underside of the crust is pressed onto the slide or the crust is removed and the slide is pressed onto the now exposed area under the crust.
STAINING TECHNIQUES
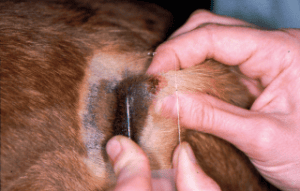
Fig. 2: In impression cytology, the slide is ‘slapped’ onto the skin lesion
The slides must first be air-dried. In practice, modified rapid staining according to Wright is most commonly used (e.g. Diff Quik® or Hemacolor®). The slide is immersed in the fixing agent followed by the red and blue staining agents for 5 seconds each. It is then gently rinsed off with tap or distilled water and allowed to air dry. The quality of the staining is sufficient to assess inflammatory exudate and gross neoplastic tissue.
ASSESSMENT/EVALUATION
First, get an overview with the lowest magnification on the microscope. Then look for an area on the slide where the cells are well stained and lie next to each other. Then go to the high magnification, where the cells and bacteria can be best assessed. The 100 mm objective with oil immersion provides a particularly impressive image.
THE SKIN BIOPSY
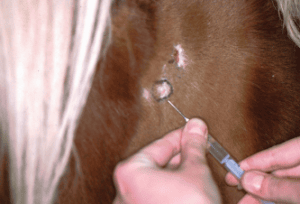
Fig. 3: The marked area is injected with lidocaine during the skin biopsy
For some skin conditions, a biopsy is the only method of coming to a definitive diagnosis. In principle, the more samples and the larger the samples, the more likely it is that a conclusive result will be obtained. Any secondary infections should be treated prior to the samples being taken, as otherwise no meaningful result can be obtained. It is also very helpful to provide the pathologist with a detailed patient history, as the pathologist is often unable to make a definitive diagnosis without a precise medical history.
In addition to basic surgical instruments, you will need scissors to trim the hair above the lesions, a coloured pencil to mark the lesions to be removed, 2% lidocaine without adrenaline, syringes, biopsy punches with a diameter of 6 and 8 mm, swabs and a container with 4 to 10% formalin. A biopsy is always indicated if lesions have an unusual appearance, no successful treatment has been achieved, the biopsy is the only diagnostic option or a tumour is suspected and a preoperative clarification of the tissue is required.
When taking samples, it is very important to leave the surface layers of the skin untouched. For this reason, the hair must be trimmed very carefully and the skin must never be pre-treated with surgical disinfectants. The hair is shortened to a length of 0.5 cm using hair scissors. The lesions to be examined must remain intact.
Biopsies are generally taken under local anaesthetic. After the site has been marked, between 0.5 and 1 ml of 2% lidocaine is injected. Distribute the agent evenly in several directions and wait a few minutes.
Several biopsies (at least 3) are then taken using a biopsy punch. The number depends on the diversity of the lesions in order to cover an as representative spectrum of the clinical picture as possible. It should be kept in consideration that fresh changes are much more informative than old ones. The skin surface is stretched between the thumb and index finger and pierced with the punch using a twisting and pressing motion. The punch is then withdrawn, the punch cylinder is held with tweezers at the subcutaneous tissue, lifted up and the biopsy is cut off at the still adhering tissue thread. The tissue cylinder should not be held against the epidermis or dermis with the tweezers, as this can lead to artefacts and make assessment more difficult.
After removal, the biopsies are carefully placed on a piece of gauze to remove any blood that may interfere with histopathological assessment. The tissue biopsy is then placed in the formalin.
The wound edges of the punch are adapted with one or two sutures or left open.
THE BACTERIOLOGICAL EXAMINATION
A bacteriological examination is necessary in the case of recurrent pyoderma, pyoderma that is resistant after 4 – 6 weeks of antibiotic therapy, rods found in the cytological examination, non-healing wounds and pyogranulomatous inflammation or if required by law. The skin lesion must not be disinfected before the sample is taken. Areas of skin under a crust are suitable for taking a swab sample. The swab is then placed in the transport medium and stored in the refrigerator until it is removed.
PCR EXAMINATIONS
On the one hand, many infectious agents can be detected by PCR testing, and on the other hand, numerous genetic tests for hereditary diseases or colours can be carried out. The sample material for infection diagnostics depends on the pathogen and the stage of infection; EDTA blood (except in the case of greying) or approx. 20 mane/tail hairs with roots are suitable for genetic tests. You can find our comprehensive range of services on our homepage and in the compendium.
ALLERGY TESTS FOR HORSES
The diagnosis of allergy should always be a clinical diagnosis based on a thorough medical history and clinical examination. The allergy test only serves to identify the triggering allergens so that they can then be specifically avoided or – in the case of atopic dermatitis, insect hypersensitivity (sweet itch) or allergy-related respiratory diseases (equine asthma) – allergen-specific immunotherapy (ASIT, hyposensitisation) can be carried out. The test result must therefore always be interpreted in conjunction with the clinic and medical history. Glucocorticoid administration can falsify the allergy test resulting in particular false negative results. The discontinuation periods for steroids before an allergy test are generally up to 3 months for sustained-release injections, 6 – 8 weeks for oral prednisolone and 2 – 4 weeks for topical formulations (local ointments, sprays, otics, etc.).
We offer cost-effective step-by-step diagnostics with a preliminary allergy test and the main tests (seasonal and year-round allergens, insects) and also a food allergy test. A brand new addition to our programme is the PAX complete test (environmental allergens and/or feed) for horses, in which allergen extracts and recombinant allergens are tested. For details, please refer to our homepage, the compendium or the allergy order form. Allergen-specific immunotherapy can of course also be obtained directly from us.
CONCLUSION
Dermatology is detective work or a jigsaw puzzle, you have to collect many ‘clues’ or ‘pieces of the puzzle’ to arrive at a diagnosis. The detailed patient history, the clinical examination of the horse’s skin and the inclusion or exclusion of differential diagnoses through various dermatological examinations ultimately lead to the final diagnosis of the skin disease.
Dr. Regina Wagner
FURTHER LITERATURE
- Laboklin. Laboruntersuchungen bei dermatologischen Problemen. Broschüre; 2021.
- Peters S. DermaSkills: Dermatologie in der Kleintierpraxis – Diagnostik mit System. Stuttgart: Schattauer; 2015. (nur Hund und Katze)
- Littlewood JD, Lloyd DH, Mark CJ. Practical Equine Dermatology. Hoboken: Wiley Blackwell; 2021